Monday, 11 January 2016

Dataguard - Snapshot Standby

Snapshot Standby: 
-----------------

Which is new feature of oracle 11g dataguard for real time testing and which is very good feature for dataguard.

Sometimes we need to make some test on our database and then we want to revert what we have done on database.

Snapshot standby database where we can basically convert the physical standby database into a READ-WRITE real time production database which we can use that database 

temporarily for our possible development testing and disaster scenario.
At the same time, it maintains protectioin by continuing to receive data from the production database, archiving it for later use.

Basically, Sanpshot standby database uses the Flashback Database technology to create a guaranteed restore point to which the database can be later flashed back to. So 

this future give us possibility on work on that database.

Steps:

1. Check db_recovery parameter on both databases (Primary & Standby)

On Primary:

show parameter db_recovery;
alter system set db_recovery_file_dest_size=50m scope=both;
alter system set db_recovery_file_dest='/u01/app/oracle/oradata/amer/amer_fbr/' sope=both;

alter database flashback on;

On Standby:

show parameter db_recover;
alter system set db_recovery_file_dest_size=50m scope=both;
alter system set db_recovery_file_dest='/u01/app/oracle/oradata/amerstd/amerstd_fbr/' scope=both;

Now check protection modes:

select protection_mode,protection_level from v$database;

Maximum availability..

By default standby is running MAXIMUM PERFORMANCE mode.

Changing protection mode: On Primary and standby:--

select PROTECTION_MODE,PROTECTION_LEVEL FROM V$DATABASE;

alter system set log_archive_dest_2='SERVICE=amer SYNC AFFIRM NET_TIMEOUT=100 REOPEN=300 DB_UNIQUE_NAME=amer VALID_FOR=(ALL_LOGFILES,PRIMARY_ROLE)' scope = both;

alter database set standby database to maximize availability;

ALTER DATABASE RECOVER MANAGED STANDBY DATABASE USING CURRENT LOGFILE DISCONNECT FROM SESSION;

alter database flashback on;

Now stop MRP process:

alter database recover managed standby database cancel;

select flashback_on from v$database;

On primary:

Now for to can be sure before after state we are creating table on primary.

create table test_table_on_primary (status varchar2(20),timestamp date);

insert into test_table_on_primary values('before snapshot',sysdate);

commit;

set linesize 1000
select * from test_table_on_primary;

Now we can keep working on standby database;

On Standby:

alter database convert to snapshot standby;

shut immediate
startup

set linesize 1000select name,guarantee_flashback_database from v$restore_point;

select open_mode,database_role from v$database;

Db should be in READ-WRITE mode and db role is Snapshot Standby

Now we are adding one new record on table which we creaetd on primary.

We are doing this to can show primary keeping redolog until our standby db will have again physical standby db_role.

When we will finish our process on snapshot database and convert it to physical standby, primary start again to send redo to standby database for apply.

On Primary:
 
Insert into test_table_on_primary values('stdbywrkngs_snapsht',sysdate);

commit;

select * from test_table_on_primary;

so as you can see we have 2 records on table.

On Standby:
 
create table test_table_on_standby (status varchar2(20));

insert into test_table_on_standby values('workingin_snapshot_role');

commit;

select open_mode,database_role from v$database;

Db should be in READ-WRITE and database role is snapshot standby.

shut immeidate
startup mount

Now we turn back our database role from SNAPSHOT STANDBY to PHYSICAL STANDBY.

alter database convert to physical standby;

shut immediate;
startup mount

select open_mode,database_role from v$database;

DB must be in READ-WRITE and DB role is PHYSICAL STANDBY.

Now start MRP process from standby db..

alter database recover managed standby database disconnect from session;

Now our standby database up and running.. What we are expecting here?

Redolog has been started to apply on standby database and our table should bring us to correct data.

On Standby:

alter database recover managed standby database cancel;

alter database open read only;

select * from test_table_on_primary;

which should be show 2 records...

On standby we created test_table_on_standby..What we are expecting here? The table should not be exist after we stopped our process

select * from test_table_on_standby;

table or view does not exist

Now restart standby database with mount mode.

shut immediate;

startup mount;

alter database recover managed standby database diconnect from session;

As we can see we can make our test without any problem with new future of oracle 11g.

################# All the best #################


http://heliosguneserol.com/2011/12/08/11g-snapshot-standby-for-real-time-testing/


Dataguard - Active Dataguard

Active Dataguard from physical standby in oracle 11g


* The main advantage of setting up active dataguard in 11g is that the database can be opened in READ-ONLY mode allowing the users to access the physical standby database for fetching reports and on the same time the physical standby database can be in recovery mode.

* Users can use select statements and complex queries against this database and thereby decreasing the load on the primary database.

While the standby is open READ-ONLY (Active dataguard standby db), the following operations are not allowing to execute..

    * Any DML except for select statements.
    * Any DDL
    * Access of local sequences
    * DMLs on local temporary tables.

Once you setup the physical standby database. 
Then we have to follow the below steps in order to configure the Active Dataguard..

Step1-

Check the status of the primary database and the latest sequence generated in the primary database.


Step2-

Check the status of the physical standby database and the latest sequence applied on the physical standby database.


Step3- 

Check if the Managed Recovery Process (MRP) is active on the physical standby database.


Step4-

Cancel the MRP on the physical stanby database and open the standby database. 
The standby database would be opened in the READ-ONLY Mode.


Step5-

Now start the MRP process on the physical standby database.


Now, Try to issue any select query on the standby database...


Here, test is my table name.......

Here, we can see that the MRP is active and is awaiting for the log Seq 60 and also the physical standby database is opened in READ-ONLY mode which would allow users to use the physical standby database for fetching reports.


## All The Best.....!!!


Dataguard - Failover and Switchover


Switch-over is the planned role change.It does not require re-installation of a new database. It can be used to test interoperability of  standby database, OS and hardware maintenance. 

Fail-over is the deformation of the production (primary) database and activating standby database as the primary.It is not reversible. When enabled, re-create the standby database.

SWITCH-OVER:

SWITCHOVER is the planned role change. So, Primary database will operate as standby and standby will operate as primary database. Which is useful for testing and to do maintenance work in production (primary) database, etc.

QUICK GUIDE

old primary site
SQL>select switchover_status from v$database;
SQL>alter database commit to switchover to physical standby with session shutdown;
SQL>shutdown immediate
SQL>startup nomount
SQL>alter database mount standby database;
SQL>alter system set log_archive_dest_state_2=defer;
old standby site
SQL>select switchover_status from v$database;
SQL>alter database commit to switchover to primary;
SQL>shutdown immediate
SQL>startup
old primary site
SQL>recover managed standby database disconnect

SQL>alter system set log_archive_dest_state_2=enable;


STEP-1: On Primary.

Switch log file on primary database.

SQL> alter system switch logfile;

STEP-2: On Primary

Check switchover status before switching database from primary to standby on primary.

SQL> select switchover_status from v$database;

You must see "TO_STANDBY" as result.

STEP-3: On Primary

Switch primary database to standby database.

SQL> alter database commit to switchover to physical standby with session shutdown;
SQL> shutdown immediate;
SQL> startup nomount;
SQL> alter database mount standby database;

STEP-4: On Primary

Defer for archive log apply. Because i didnt set my standby database a primary yet.

SQL> alter system set log_archive_dest_state_2=defer;

STEP-5: On Standby

Switch standby database to primary. Check switchover status berfore switching database on standby database.

SQL> select switchover_status from v$database;

You must see "TO_PRIMARY" as result. Now lets swtich

alter database commit to switchover to primary;
shutdown immediate;
startup;

Our switchover process is successfully completed.

STEP-6: On Primary

Start real-time recovery process.

recover managed standby database using current logfile disconnect;

Finally lets open our database with "Read-only with apply".

recover managed standby database cancle;

alter database open;

recover managed standby database using current logfile disconnect;


@@ All the best...!!! :)

FAIL-OVER:


Dataguard - Creating Logical Standby Database on Oracle 11g R2


Dataguard - Creating physical standby database using RMAN Duplicate command on Oracle 11gR2

Dataguard - Creating physical standby database using RMAN Duplicate command on Oracle 11gR2
-------------------------------------------

Some Key points before proceeding with the physical standby setup:

* Primary database should be in archivelog mode.
* Forced logging is on in primary database.
* Initialization parameter "DB_NAME" should be same on both primary   and standby database.
* Initialization parameter "DB_UNIQUE_NAME" should be different on     primary and standby database.

Primary Database : AMER
Standby Database : AMERSTD

0. Check if the primary database is in archive log mode enabled or      not.If not enable the archive log mode.
   
   For this, we have to shutdown the primary database and startup      the database in MOUNT state to enable the archive log mode.

   Primary Database:


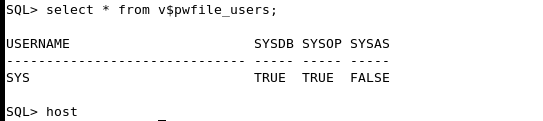
1. Check if the primary database is using the password file or not. If not, then create one as below.

SELECT * FROM V$PWFILE_USERS;

Connect to the user prompt and issue the following command.

$orapwd file=$ORACLE_HOME/dbs/orapwAMER password=oracle force=y


2. Add the following parameters in the initialization parameter file of the primary database.

$vi $ORACLE_HOME/dbs/initAMER.oracle

amer.__db_cache_size=159383552
amer.__java_pool_size=4194304
amer.__large_pool_size=4194304
amer.__oracle_base='/u01/app/oracle'#ORACLE_BASE set from environment
amer.__pga_aggregate_target=155189248
amer.__sga_target=264241152
amer.__shared_io_pool_size=0
amer.__shared_pool_size=88080384
amer.__streams_pool_size=0
*.audit_file_dest='/u01/app/oracle/admin/amer/adump'
*.audit_trail='db'
*.compatible='11.2.0.0.0'
*.control_files='/u01/app/oracle/oradata/amer/control01.ctl','/u01/app/oracle/oradata/amer/control02.ctl'
*.db_block_size=8192
*.db_domain=''
*.db_name='amer'
*.diagnostic_dest='/u01/app/oracle'
*.dispatchers='(PROTOCOL=TCP) (SERVICE=amerXDB)'
*.memory_target=419430400
*.open_cursors=300
*.processes=150
*.service_names='amer'
*.undo_tablespace='UNDOTBS1'

##Dataguard Configuartion Parameters:

*.db_unique_name='amer'
*.db_file_name_convert='/u01/app/oracle/oradata/amerstd','/u01/app/oracle/oradata/amer'
*.log_file_name_convert='/u01/app/oracle/oradata/amerstd','/u01/app/oracle/oradata/amer'
*.fal_client='amer'
*.fal_server='amerstd'
*.log_archive_config='dg_config=(amer,amerstd)'
*.log_archive_dest_1='location=/u01/app/oracle/oradata/amer_arch valid_for=(all_logfiles,all_roles) db_unique_name=amer'
*.log_archive_dest_2='service=amerstd valid_for=(online_logfile, primary_role) db_unique_name=amerstd'
*.log_archive_dest_state_1='ENABLE'
*.log_archive_dest_state_2='ENABLE'
*.remote_login_passwordfile='EXCLUSIVE'
*.standby_file_management='auto'

3. Listener and tnsnames entries on primary database.

Location of the network configuration files:

/u01/app/oracle/product/11.2.0/db_1/network/admin

--------------------
### LISTENER.ORA ###
--------------------

[oracle@amer admin]$ more listener.ora
# listener.ora Network Configuration File: /u01/app/oracle/product/11.2.0/db_1/network/admin/listener.ora
# Generated by Oracle configuration tools.

LISTENER =
        (DESCRIPTION_LIST =
                (DESCRIPTION =
                (ADDRESS = (PROTOCOL = TCP)(HOST = 192.168.141.22)(PORT = 1521))
                )
        )

SID_LIST_LISTENER =
        (SID_LIST =
                (SID_DESC =
                        (SID_NAME = amer)
                        (ORACLE_HOME = /u01/app/oracle/product/11.2.0/db_1)
                )
        )

ADR_BASE_LISTENER = /u01/app/oracle

ENABLE_GLOBAL_DYNAMIC_ENDPOINT_LISTENER = ON

[oracle@amer admin]$ 

--------------------
### TNSNAMES.ORA ###
--------------------
[oracle@amer admin]$ more tnsnames.ora 
# tnsnames.ora Network Configuration File: /u01/app/oracle/product/11.2.0/db_1/network/admin/tnsnames.ora
# Generated by Oracle configuration tools.

AMER =
  (DESCRIPTION =
    (ADDRESS_LIST =
      (ADDRESS = (PROTOCOL = TCP)(HOST = 192.168.141.22)(PORT = 1521))
    )
    (CONNECT_DATA =
      (SERVICE_NAME = amer)
    )
  )


AMERSTD =
  (DESCRIPTION =
    (ADDRESS_LIST =
      (ADDRESS = (PROTOCOL = TCP)(HOST = 192.168.141.33)(PORT = 1521))
    )
    (CONNECT_DATA =
      (SERVICE_NAME = amerstd)
    )
  )
[oracle@amer admin]$ 

4. Now copy the orapwd file, init<sid>.ora and network configuration (listener.ora/tnsnames.ora) files from primary database (amer) to standby database (amerstd) located at $ORACLE_HOME/dbs and $ORACLE_HOME/network/admin
   
$cd $ORACLE_HOME/dbs
   
$scp orapwdAMER oracle@192.168.141.33:/u01/app/oracle/product/11.2.0/db_1/dbs

$scp initAMER.ora oracle@192.168.141.33:/u01/app/oracle/product/11.2.0/db_1/dbs
   
$cd $ORACLE_HOME/network/admin
   
$scp listener.ora oracle@192.168.141.33:/u01/app/oracle/product/11.2.0/db_1/network/admin

$scp tnsnames.ora oracle@192.168.141.33:/u01/app/oracle/product/11.2.0/db_1/network/admin
   
Here, oracle is the username of standby database and 192.168.141.33 is standby database ip.
   
Now go to STANDBY Database server and do change parameters and file names accordingly.
   
5. Now change the name of the password file with standby database name.

$mv orapwdAMER orapwdAMERSTD

6. Change the init file name and parameters as below.

amerstd.__db_cache_size=159383552
amerstd.__java_pool_size=4194304
amerstd.__large_pool_size=4194304
amerstd.__oracle_base='/u01/app/oracle'#ORACLE_BASE set from environment
amerstd.__pga_aggregate_target=155189248
amerstd.__sga_target=264241152
amerstd.__shared_io_pool_size=0
amerstd.__shared_pool_size=88080384
amerstd.__streams_pool_size=0
*.audit_file_dest='/u01/app/oracle/admin/amerstd/adump'
*.audit_trail='db'
*.compatible='11.2.0.0.0'
*.control_files='/u01/app/oracle/oradata/amerstd/control01.ctl','/u01/app/oracle/oradata/amerstd/control02.ctl'
*.db_block_size=8192
*.db_domain=''
*.db_name='amer'
*.diagnostic_dest='/u01/app/oracle'
*.dispatchers='(PROTOCOL=TCP) (SERVICE=amerstdXDB)'
*.memory_target=419430400
*.open_cursors=300
*.processes=150
*.undo_tablespace='UNDOTBS1'

#Dataguard Config Parameters

db_unique_name=amerstd
log_archive_config='dg_config=(amerstd,amer)'
log_archive_dest_1='location=/u01/app/oracle/oradata/amerstd_arch valid_for=(all_logfiles,all_roles) db_unique_name=amerstd'
log_archive_dest_2='service=amer valid_for=(online_logfile, primary_role) db_unique_name=amer'
log_archive_dest_state_1='ENABLE'
log_archive_dest_state_2='ENABLE'
fal_client=amerstd
fal_server=amer
service_names = amerstd
remote_login_passwordfile='EXCLUSIVE'
standby_file_management=auto
db_file_name_convert='/u01/app/oracle/oradata/amer','/u01/app/oracle/oradata/amerstd'
log_file_name_convert='/u01/app/oracle/oradata/amer','/u01/app/oracle/oradata/amerstd'

7. Now change the tns and listener entries on stand by database as below.

[oracle@euro admin]$ more listener.ora 
# listener.ora Network Configuration File: /u01/app/oracle/product/11.2.0/db_1/network/admin/listener.ora
# Generated by Oracle configuration tools.

LISTENER =
        (DESCRIPTION_LIST =
                (DESCRIPTION =
                (ADDRESS = (PROTOCOL = TCP)(HOST = 192.168.141.33)(PORT = 1521))
                )
        )

SID_LIST_LISTENER =
        (SID_LIST =
                (SID_DESC =
                        (SID_NAME = amerstd)
                        (ORACLE_HOME = /u01/app/oracle/product/11.2.0/db_1)
                )
        )

ADR_BASE_LISTENER = /u01/app/oracle

ENABLE_GLOBAL_DYNAMIC_ENDPOINT_LISTENER = ON

[oracle@euro admin]$ 

[oracle@euro admin]$ more tnsnames.ora 
# tnsnames.ora Network Configuration File: /u01/app/oracle/product/11.2.0/db_1/network/admin/tnsnames.ora
# Generated by Oracle configuration tools.

AMERSTD =
  (DESCRIPTION =
    (ADDRESS_LIST =
      (ADDRESS = (PROTOCOL = TCP)(HOST = 192.168.141.33)(PORT = 1521))
    )
    (CONNECT_DATA =
      (SERVICE_NAME = amerstd)
    )
  )


AMER =
  (DESCRIPTION =
    (ADDRESS_LIST =
      (ADDRESS = (PROTOCOL = TCP)(HOST = 192.168.141.22)(PORT = 1521))
    )
    (CONNECT_DATA =
      (SERVICE_NAME = amer)
    )
  )
[oracle@euro admin]$ 

8. Now start the database with startup nomount on standby database with standby pfile.

startup nomount pfile='$ORACLE_HOME/initamerstd.ora';

Standby databse should be in nomount state.

9. Now start listener on standby database.

10. Now open primary database in READ WRITE mode and start listener.

11. Test connectivity to auxilary (amerstd) and target (amer) instances from both hosts using tns:

Make sure your connectivity to the source database and to your auxiliary instance works fine;
Otherwise, duplicate from active database wont work.

sqlplus sys/passwd@amer as sysdba
sqlplus sys/passwd@amerstd as sysdba

Try above commands on both target and auxiliary hosts amer and amerstd. Do not continue unless your connectivity is fine.

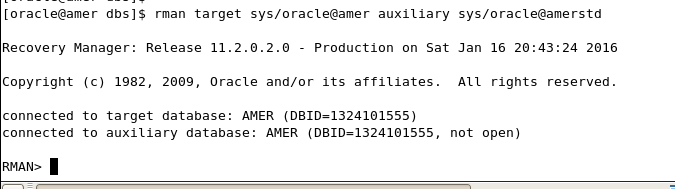
12. If every thing is fine. Now connect to the primary database as target database and standby database as auxiliary instance through RMAN. Make sure that the primary database is open and the standby database is in nomount stage (Started).

Primary Database (AMER/amer) - Open State (READ-WRITE)
Standby Database (AMER/amerstd) - NOMount State (NOMOUNT)


From primary (AMER) database:

amer$rman target sys/oracle@amer auxiliary sys/oracle@amerstd


Then issue the following command from primary database to create standby database in 

rman>duplicate target database for standby from active database nofilenamecheck;

13. Once the duplicate is completed, Close the RMAN prompt and connect to the standby database through SQL.

sqlplus sys/oracle@amerstd as sysdba

check the status of the standby database by make sure it is in mount stage.

select status, instance_name,database_role from v$instance, v$database;


14. Now start the managed recovery process on the standby database.

alter database recover managed standby database disconnect from session;

Now check if the managed recovery process (MRP) has been started on the standby database or not.

select process, status, sequence# from v$managed_standby;


Here, the MRP has been started and is waiting for the log sequence# 89. If MRP is not started, then the above query would not show up the MRP0 under the process column.

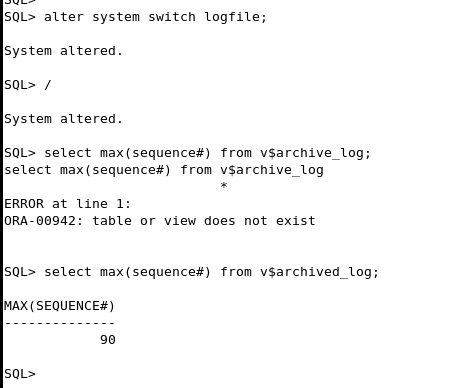
15. On the primary database, perform a few log switches and check if the logs are applied to the standby daabase.

sqlplus sys/<password>@amer as sysdba


Now connect to standby database and check..whether the sequence is same or not.

sqlplus sys/<password>@amerstd as sysdba


Here the maximum sequence# generated on the primary database is 90 and the maximum sequence# applied on the standby database is also 90 which means that the standby database is in SYNC with the primary database.

## All the best......!!!


Thursday, 31 December 2015

Oracle Row Chaining and Migration

Oracle Row Chaining and Migration:


If we notice poor performance in your oracle database Row chaining and Row Migration may be one of several reasons.

Row migration and Row chaining are two potential problems that can be prevented. By suitable diagnosing, we can improve database performance.

The main considerations are:

* What is Row Migration and Row Chaining?
* How to identify Row Migration and Row Chaining?
* How to avoid Row Migration and Row Chaining?

Migrated rows affect OLTP systems which use indexed reads to read singleton rows. In the worst case, we can add an extra I/O to all reads which would be really bad. Truly chained rows affect index reads and full table scans.

OLTP : On-line Transaction Processing is a class of software programs capable of supporting Transaction-Oriented applications on the internet. Typically, OLTP systems are used for order entry, financial trasactions, customer relationship management (CRM) and retail sales.

Oracle Block:

-------------

The Operating System Block Size is the minimum unit of operation (Read/Write) by the OS and is a property of the OS file system.
While creating an oracle database we have to choose the <<Database Block Size>> as a multiple of the Operating System Block size.
The minimum unit of operation (Read/Write) by the Oracle Database would be this <<Oracle Block>>, and not the OS block.
Once set, the <<Database Block Size>> cannot be changed during the life of the database (except in case of Oracle 9i). 
To decide on a suitable block size for the database, we take into consideration factors like the size of the database and the concurrent number of transactions expected.

The database block has the following structure (Within the whole database structure).


Header:
Header contains the general infomation about the data i.e. block address, Type of segment (table, index etc).
It also contains the information about table and the actual row (address) which that holds the data.

Freespace:
Space allocated for future update/insert oprations. Generally affected by the values of PCTFREE and PCTUSED paramters.

Data:
Actual row data.

FREELIST, PCTFREE and PCTUSED:

While creating/altering any table/index, Oracle used two storage parameters for space control.
PCTFREE - The percentage of space reserved for future update of existing data.
PCTUSED - The percentage of minimum space used for insertion of new data.The value determines when the block gets back into the FREELISTS structure.
FREELIST - Structure where Oracle maintains a list of all free available blocks.

    Oracle will first search for a free block in the FREELIST and then the data is inserted into that block.The availability of the block in the FREELIST is decided by the PCTFREE value. Initially an empty block will be listed in the FREELIST structure, and it will continue to remain there until the free spae reaches the PCTFREE value.

    Oracle use FREELIST to increase the performance. So for every insert operation, oracle needs to search for the free blocks only from the FREELIST structure instead of searching all blocks.


ROW MIGRATION:
--------------
We will migrate a row when an update to that row would cause it to not fit on the block anymore (with all of the other data that exists there currently). 
A migration means that the entire row will move and we just leave behined the <<forwarding address>>.
So, the original block just has the rowid (address of the rows) of the new block and the entire row is moved.


Full table scans are not affected by migrated rows:
---------------------------------------------------
The forwarding addresses are ignored. We know that as we continue the full scan, we'll eventually get to that row so we can ignore the forwarding address and just process the row when we get there. Hence, in full scan migrated rows don't cause us to really do any extra work.

Index Read will cause additional IO's on migrated rows:
-------------------------------------------------------
When we index Read into a table, then a migrated row will cause additional IO's. That is because the index will tell us <<goto file x, block y, slot z to find this row>>. But when we get there we find a message that says <<well, really got file a, block b, slot c to find this row>>. we have to do another IO (Logical or Physical) to find the row.

ROW CHANNING:
-------------
A row is too large to fit into a single database block. For example, if you use a 4KB blocksize for your database, and you need to insert a row of 8KB into it, Oracle will use 3 blocks and store the row in pieces. Some conditions that will cause row chaining are: Tables whose rowsize exceeds the blocksize. Tables with LONG and LONG RAW columns are prone to having chained rows. Tables with more then 255 columns will have chained rows as oracle break wide tables up into pieces. So, instead of just having a forwarding address on one block and the data on another we have data on two or more blocks.


Chained rows affect us differently. Here, it depends on the data we need. If we had a row with two columns that was spread over two blocks, the query:

select col1 from table;

where col1 is in block 1, would not cause any <<table fetch continued row>>. It would not actually have to get col2, it would not follow the chained row all of the way out. On the other hand, if we ask for:

select col2 from table;

and col2 is in block2 due to row chaining, then you would in fact see a <<table fetch continued row>>.