Monday, 11 January 2016

Dataguard - Creating physical standby database using RMAN Duplicate command on Oracle 11gR2
Dataguard - Creating physical standby database using RMAN Duplicate command on Oracle 11gR2
-------------------------------------------
* Primary database should be in archivelog mode.
* Forced logging is on in primary database.
* Initialization parameter "DB_NAME" should be same on both primary and standby database.
* Initialization parameter "DB_UNIQUE_NAME" should be different on primary and standby database.
Primary Database : AMER
Standby Database : AMERSTD
0. Check if the primary database is in archive log mode enabled or not.If not enable the archive log mode.
For this, we have to shutdown the primary database and startup the database in MOUNT state to enable the archive log mode.
Primary Database:


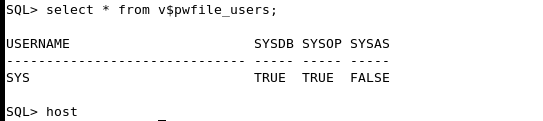
1. Check if the primary database is using the password file or not. If not, then create one as below.
SELECT * FROM V$PWFILE_USERS;
Connect to the user prompt and issue the following command.
$orapwd file=$ORACLE_HOME/dbs/orapwAMER password=oracle force=y

2. Add the following parameters in the initialization parameter file of the primary database.
$vi $ORACLE_HOME/dbs/initAMER.oracle
amer.__db_cache_size=159383552
amer.__java_pool_size=4194304
amer.__large_pool_size=4194304
amer.__oracle_base='/u01/app/oracle'#ORACLE_BASE set from environment
amer.__pga_aggregate_target=155189248
amer.__sga_target=264241152
amer.__shared_io_pool_size=0
amer.__shared_pool_size=88080384
amer.__streams_pool_size=0
*.audit_file_dest='/u01/app/oracle/admin/amer/adump'
*.audit_trail='db'
*.compatible='11.2.0.0.0'
*.control_files='/u01/app/oracle/oradata/amer/control01.ctl','/u01/app/oracle/oradata/amer/control02.ctl'
*.db_block_size=8192
*.db_domain=''
*.db_name='amer'
*.diagnostic_dest='/u01/app/oracle'
*.dispatchers='(PROTOCOL=TCP) (SERVICE=amerXDB)'
*.memory_target=419430400
*.open_cursors=300
*.processes=150
*.service_names='amer'
*.undo_tablespace='UNDOTBS1'
##Dataguard Configuartion Parameters:
*.db_unique_name='amer'
*.db_file_name_convert='/u01/app/oracle/oradata/amerstd','/u01/app/oracle/oradata/amer'
*.log_file_name_convert='/u01/app/oracle/oradata/amerstd','/u01/app/oracle/oradata/amer'
*.fal_client='amer'
*.fal_server='amerstd'
*.log_archive_config='dg_config=(amer,amerstd)'
*.log_archive_dest_1='location=/u01/app/oracle/oradata/amer_arch valid_for=(all_logfiles,all_roles) db_unique_name=amer'
*.log_archive_dest_2='service=amerstd valid_for=(online_logfile, primary_role) db_unique_name=amerstd'
*.log_archive_dest_state_1='ENABLE'
*.log_archive_dest_state_2='ENABLE'
*.remote_login_passwordfile='EXCLUSIVE'
*.standby_file_management='auto'
3. Listener and tnsnames entries on primary database.
Location of the network configuration files:
/u01/app/oracle/product/11.2.0/db_1/network/admin
--------------------
### LISTENER.ORA ###
--------------------
[oracle@amer admin]$ more listener.ora
# listener.ora Network Configuration File: /u01/app/oracle/product/11.2.0/db_1/network/admin/listener.ora
# Generated by Oracle configuration tools.
LISTENER =
(DESCRIPTION_LIST =
(DESCRIPTION =
(ADDRESS = (PROTOCOL = TCP)(HOST = 192.168.141.22)(PORT = 1521))
)
)
SID_LIST_LISTENER =
(SID_LIST =
(SID_DESC =
(SID_NAME = amer)
(ORACLE_HOME = /u01/app/oracle/product/11.2.0/db_1)
)
)
ADR_BASE_LISTENER = /u01/app/oracle
ENABLE_GLOBAL_DYNAMIC_ENDPOINT_LISTENER = ON
[oracle@amer admin]$
--------------------
### TNSNAMES.ORA ###
--------------------
[oracle@amer admin]$ more tnsnames.ora
# tnsnames.ora Network Configuration File: /u01/app/oracle/product/11.2.0/db_1/network/admin/tnsnames.ora
# Generated by Oracle configuration tools.
AMER =
(DESCRIPTION =
(ADDRESS_LIST =
(ADDRESS = (PROTOCOL = TCP)(HOST = 192.168.141.22)(PORT = 1521))
)
(CONNECT_DATA =
(SERVICE_NAME = amer)
)
)
AMERSTD =
(DESCRIPTION =
(ADDRESS_LIST =
(ADDRESS = (PROTOCOL = TCP)(HOST = 192.168.141.33)(PORT = 1521))
)
(CONNECT_DATA =
(SERVICE_NAME = amerstd)
)
)
[oracle@amer admin]$
4. Now copy the orapwd file, init<sid>.ora and network configuration (listener.ora/tnsnames.ora) files from primary database (amer) to standby database (amerstd) located at $ORACLE_HOME/dbs and $ORACLE_HOME/network/admin
$cd $ORACLE_HOME/dbs
$scp orapwdAMER oracle@192.168.141.33:/u01/app/oracle/product/11.2.0/db_1/dbs
$scp initAMER.ora oracle@192.168.141.33:/u01/app/oracle/product/11.2.0/db_1/dbs
$cd $ORACLE_HOME/network/admin
$scp listener.ora oracle@192.168.141.33:/u01/app/oracle/product/11.2.0/db_1/network/admin
$scp tnsnames.ora oracle@192.168.141.33:/u01/app/oracle/product/11.2.0/db_1/network/admin
Here, oracle is the username of standby database and 192.168.141.33 is standby database ip.
Now go to STANDBY Database server and do change parameters and file names accordingly.
5. Now change the name of the password file with standby database name.
$mv orapwdAMER orapwdAMERSTD
6. Change the init file name and parameters as below.
amerstd.__db_cache_size=159383552
amerstd.__java_pool_size=4194304
amerstd.__large_pool_size=4194304
amerstd.__oracle_base='/u01/app/oracle'#ORACLE_BASE set from environment
amerstd.__pga_aggregate_target=155189248
amerstd.__sga_target=264241152
amerstd.__shared_io_pool_size=0
amerstd.__shared_pool_size=88080384
amerstd.__streams_pool_size=0
*.audit_file_dest='/u01/app/oracle/admin/amerstd/adump'
*.audit_trail='db'
*.compatible='11.2.0.0.0'
*.control_files='/u01/app/oracle/oradata/amerstd/control01.ctl','/u01/app/oracle/oradata/amerstd/control02.ctl'
*.db_block_size=8192
*.db_domain=''
*.db_name='amer'
*.diagnostic_dest='/u01/app/oracle'
*.dispatchers='(PROTOCOL=TCP) (SERVICE=amerstdXDB)'
*.memory_target=419430400
*.open_cursors=300
*.processes=150
*.undo_tablespace='UNDOTBS1'
#Dataguard Config Parameters
db_unique_name=amerstd
log_archive_config='dg_config=(amerstd,amer)'
log_archive_dest_1='location=/u01/app/oracle/oradata/amerstd_arch valid_for=(all_logfiles,all_roles) db_unique_name=amerstd'
log_archive_dest_2='service=amer valid_for=(online_logfile, primary_role) db_unique_name=amer'
log_archive_dest_state_1='ENABLE'
log_archive_dest_state_2='ENABLE'
fal_client=amerstd
fal_server=amer
service_names = amerstd
remote_login_passwordfile='EXCLUSIVE'
standby_file_management=auto
db_file_name_convert='/u01/app/oracle/oradata/amer','/u01/app/oracle/oradata/amerstd'
log_file_name_convert='/u01/app/oracle/oradata/amer','/u01/app/oracle/oradata/amerstd'
7. Now change the tns and listener entries on stand by database as below.
[oracle@euro admin]$ more listener.ora
# listener.ora Network Configuration File: /u01/app/oracle/product/11.2.0/db_1/network/admin/listener.ora
# Generated by Oracle configuration tools.
LISTENER =
(DESCRIPTION_LIST =
(DESCRIPTION =
(ADDRESS = (PROTOCOL = TCP)(HOST = 192.168.141.33)(PORT = 1521))
)
)
SID_LIST_LISTENER =
(SID_LIST =
(SID_DESC =
(SID_NAME = amerstd)
(ORACLE_HOME = /u01/app/oracle/product/11.2.0/db_1)
)
)
ADR_BASE_LISTENER = /u01/app/oracle
ENABLE_GLOBAL_DYNAMIC_ENDPOINT_LISTENER = ON
[oracle@euro admin]$
[oracle@euro admin]$ more tnsnames.ora
# tnsnames.ora Network Configuration File: /u01/app/oracle/product/11.2.0/db_1/network/admin/tnsnames.ora
# Generated by Oracle configuration tools.
AMERSTD =
(DESCRIPTION =
(ADDRESS_LIST =
(ADDRESS = (PROTOCOL = TCP)(HOST = 192.168.141.33)(PORT = 1521))
)
(CONNECT_DATA =
(SERVICE_NAME = amerstd)
)
)
AMER =
(DESCRIPTION =
(ADDRESS_LIST =
(ADDRESS = (PROTOCOL = TCP)(HOST = 192.168.141.22)(PORT = 1521))
)
(CONNECT_DATA =
(SERVICE_NAME = amer)
)
)
[oracle@euro admin]$
8. Now start the database with startup nomount on standby database with standby pfile.
startup nomount pfile='$ORACLE_HOME/initamerstd.ora';
Standby databse should be in nomount state.
9. Now start listener on standby database.
10. Now open primary database in READ WRITE mode and start listener.
11. Test connectivity to auxilary (amerstd) and target (amer) instances from both hosts using tns:
Make sure your connectivity to the source database and to your auxiliary instance works fine;
Otherwise, duplicate from active database wont work.
sqlplus sys/passwd@amer as sysdba
sqlplus sys/passwd@amerstd as sysdba
Try above commands on both target and auxiliary hosts amer and amerstd. Do not continue unless your connectivity is fine.
12. If every thing is fine. Now connect to the primary database as target database and standby database as auxiliary instance through RMAN. Make sure that the primary database is open and the standby database is in nomount stage (Started).
Primary Database (AMER/amer) - Open State (READ-WRITE)
Standby Database (AMER/amerstd) - NOMount State (NOMOUNT)
From primary (AMER) database:
amer$rman target sys/oracle@amer auxiliary sys/oracle@amerstd
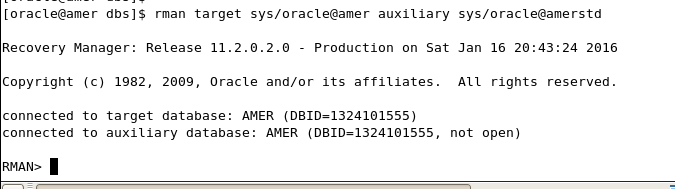
Then issue the following command from primary database to create standby database in
rman>duplicate target database for standby from active database nofilenamecheck;
13. Once the duplicate is completed, Close the RMAN prompt and connect to the standby database through SQL.
sqlplus sys/oracle@amerstd as sysdba
check the status of the standby database by make sure it is in mount stage.
select status, instance_name,database_role from v$instance, v$database;

14. Now start the managed recovery process on the standby database.
alter database recover managed standby database disconnect from session;
Now check if the managed recovery process (MRP) has been started on the standby database or not.
select process, status, sequence# from v$managed_standby;

Here, the MRP has been started and is waiting for the log sequence# 89. If MRP is not started, then the above query would not show up the MRP0 under the process column.
15. On the primary database, perform a few log switches and check if the logs are applied to the standby daabase.
sqlplus sys/<password>@amer as sysdba
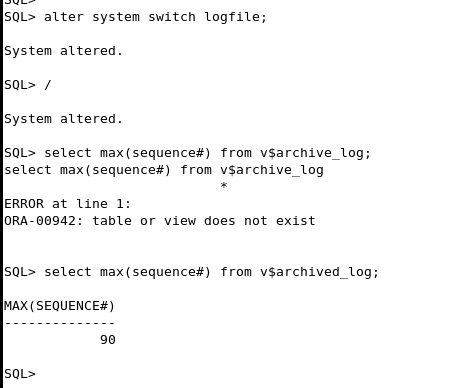
Now connect to standby database and check..whether the sequence is same or not.
sqlplus sys/<password>@amerstd as sysdba

Here the maximum sequence# generated on the primary database is 90 and the maximum sequence# applied on the standby database is also 90 which means that the standby database is in SYNC with the primary database.
## All the best......!!!
Thursday, 31 December 2015
Oracle Row Chaining and Migration
Oracle Row Chaining and Migration:
If we notice poor performance in your oracle database Row chaining and Row Migration may be one of several reasons.
Row migration and Row chaining are two potential problems that can be prevented. By suitable diagnosing, we can improve database performance.
The main considerations are:
* What is Row Migration and Row Chaining?
* How to identify Row Migration and Row Chaining?
* How to avoid Row Migration and Row Chaining?
Migrated rows affect OLTP systems which use indexed reads to read singleton rows. In the worst case, we can add an extra I/O to all reads which would be really bad. Truly chained rows affect index reads and full table scans.
OLTP : On-line Transaction Processing is a class of software programs capable of supporting Transaction-Oriented applications on the internet. Typically, OLTP systems are used for order entry, financial trasactions, customer relationship management (CRM) and retail sales.
Oracle Block:
-------------
The Operating System Block Size is the minimum unit of operation (Read/Write) by the OS and is a property of the OS file system.
While creating an oracle database we have to choose the <<Database Block Size>> as a multiple of the Operating System Block size.
The minimum unit of operation (Read/Write) by the Oracle Database would be this <<Oracle Block>>, and not the OS block.
Once set, the <<Database Block Size>> cannot be changed during the life of the database (except in case of Oracle 9i).
To decide on a suitable block size for the database, we take into consideration factors like the size of the database and the concurrent number of transactions expected.
The database block has the following structure (Within the whole database structure).

Header:
Header contains the general infomation about the data i.e. block address, Type of segment (table, index etc).
It also contains the information about table and the actual row (address) which that holds the data.
Freespace:
Space allocated for future update/insert oprations. Generally affected by the values of PCTFREE and PCTUSED paramters.
Data:
Actual row data.
FREELIST, PCTFREE and PCTUSED:
While creating/altering any table/index, Oracle used two storage parameters for space control.
PCTFREE - The percentage of space reserved for future update of existing data.
PCTUSED - The percentage of minimum space used for insertion of new data.The value determines when the block gets back into the FREELISTS structure.
FREELIST - Structure where Oracle maintains a list of all free available blocks.
Oracle will first search for a free block in the FREELIST and then the data is inserted into that block.The availability of the block in the FREELIST is decided by the PCTFREE value. Initially an empty block will be listed in the FREELIST structure, and it will continue to remain there until the free spae reaches the PCTFREE value.
Oracle use FREELIST to increase the performance. So for every insert operation, oracle needs to search for the free blocks only from the FREELIST structure instead of searching all blocks.
ROW MIGRATION:
--------------
We will migrate a row when an update to that row would cause it to not fit on the block anymore (with all of the other data that exists there currently).
A migration means that the entire row will move and we just leave behined the <<forwarding address>>.
So, the original block just has the rowid (address of the rows) of the new block and the entire row is moved.


Row migration and Row chaining are two potential problems that can be prevented. By suitable diagnosing, we can improve database performance.
The main considerations are:
* What is Row Migration and Row Chaining?
* How to identify Row Migration and Row Chaining?
* How to avoid Row Migration and Row Chaining?
Migrated rows affect OLTP systems which use indexed reads to read singleton rows. In the worst case, we can add an extra I/O to all reads which would be really bad. Truly chained rows affect index reads and full table scans.
OLTP : On-line Transaction Processing is a class of software programs capable of supporting Transaction-Oriented applications on the internet. Typically, OLTP systems are used for order entry, financial trasactions, customer relationship management (CRM) and retail sales.
Oracle Block:
-------------
The Operating System Block Size is the minimum unit of operation (Read/Write) by the OS and is a property of the OS file system.
While creating an oracle database we have to choose the <<Database Block Size>> as a multiple of the Operating System Block size.
The minimum unit of operation (Read/Write) by the Oracle Database would be this <<Oracle Block>>, and not the OS block.
Once set, the <<Database Block Size>> cannot be changed during the life of the database (except in case of Oracle 9i).
To decide on a suitable block size for the database, we take into consideration factors like the size of the database and the concurrent number of transactions expected.
The database block has the following structure (Within the whole database structure).

Header:
Header contains the general infomation about the data i.e. block address, Type of segment (table, index etc).
It also contains the information about table and the actual row (address) which that holds the data.
Freespace:
Space allocated for future update/insert oprations. Generally affected by the values of PCTFREE and PCTUSED paramters.
Data:
Actual row data.
FREELIST, PCTFREE and PCTUSED:
While creating/altering any table/index, Oracle used two storage parameters for space control.
PCTFREE - The percentage of space reserved for future update of existing data.
PCTUSED - The percentage of minimum space used for insertion of new data.The value determines when the block gets back into the FREELISTS structure.
FREELIST - Structure where Oracle maintains a list of all free available blocks.
Oracle will first search for a free block in the FREELIST and then the data is inserted into that block.The availability of the block in the FREELIST is decided by the PCTFREE value. Initially an empty block will be listed in the FREELIST structure, and it will continue to remain there until the free spae reaches the PCTFREE value.
Oracle use FREELIST to increase the performance. So for every insert operation, oracle needs to search for the free blocks only from the FREELIST structure instead of searching all blocks.
ROW MIGRATION:
--------------
We will migrate a row when an update to that row would cause it to not fit on the block anymore (with all of the other data that exists there currently).
A migration means that the entire row will move and we just leave behined the <<forwarding address>>.
So, the original block just has the rowid (address of the rows) of the new block and the entire row is moved.
Full table scans are not affected by migrated rows:
---------------------------------------------------
The forwarding addresses are ignored. We know that as we continue the full scan, we'll eventually get to that row so we can ignore the forwarding address and just process the row when we get there. Hence, in full scan migrated rows don't cause us to really do any extra work.
Index Read will cause additional IO's on migrated rows:
-------------------------------------------------------
When we index Read into a table, then a migrated row will cause additional IO's. That is because the index will tell us <<goto file x, block y, slot z to find this row>>. But when we get there we find a message that says <<well, really got file a, block b, slot c to find this row>>. we have to do another IO (Logical or Physical) to find the row.
ROW CHANNING:
-------------
A row is too large to fit into a single database block. For example, if you use a 4KB blocksize for your database, and you need to insert a row of 8KB into it, Oracle will use 3 blocks and store the row in pieces. Some conditions that will cause row chaining are: Tables whose rowsize exceeds the blocksize. Tables with LONG and LONG RAW columns are prone to having chained rows. Tables with more then 255 columns will have chained rows as oracle break wide tables up into pieces. So, instead of just having a forwarding address on one block and the data on another we have data on two or more blocks.
Chained rows affect us differently. Here, it depends on the data we need. If we had a row with two columns that was spread over two blocks, the query:
select col1 from table;
where col1 is in block 1, would not cause any <<table fetch continued row>>. It would not actually have to get col2, it would not follow the chained row all of the way out. On the other hand, if we ask for:
select col2 from table;
and col2 is in block2 due to row chaining, then you would in fact see a <<table fetch continued row>>.
Tuesday, 29 December 2015
Performing Tablespace Point-in-Time Recovery
Performing Tablespace Point-in-Time Recovery
In the following post we’ll see how to recover tablespace to a point in time (TSPITR), some of the young DBAs would be thinking why do we need to do TSPITR its an incomplete recovery and why would we ever want to do so. To those I would like to introduce them to a fraternity known as Developer (refereed as an application guy), If you are a DBA these guys job is to make sure that each and every penny that Organisation is giving you is paid off. There are n number of ways in which they do that (Did I hear the F- word…), well you’ll come across a scenario where a developer thought that they were in a test environment and issued commands to delete data from several tables in one tablespace whereas It turns out that they were in the production environment ( It might seem Stupid but I don’t know a single DBA who hasn’t faced such a situation).
So this post is to describe how to use TSPITR to restore the tablespace in question to the point-in-time just before the DELETE ( Or any other erroneous DML/DDL ) was issued.
For ease of discussion lets name the Tablespace for which we have to perform TSPITR as USERS.
STEP 1:- Determine and Resolve Dependencies between the objects in the tablespace of interest (USERS) and objects related to these via referential integrity constraint.
To get these dependencies Oracle has given a view called as TS_PITR_CHECK, which can be used as:-
SELECT * FROM sys.ts_pitr_check WHERE (ts1_name = ‘USERS‘ AND ts2_name != ‘USERS‘) OR (ts1_name != ‘USERS‘ AND ts2_name = ‘USERS‘);
So if there are any dependencies the above query would give you all the details that are required, and accordingly you can disable the constraints and make a note of it. If we don’t disable the constraints, TSPITR would not be successful.
STEP 2:- Determine Which Objects Will Not Be Recovered
We are doing a TSPITR to a point-in-time when that erroneous SQL was executed, so what about objects which were created after that time, here comes the introduction to a new fraternity which are known as Database Administrators, no matter how poorly the SQl are written, no matter what edition the database is, no matter what infra does the database run, DBAs have to ensure magical performance and almost recovery of everything… EVERYTHING… (Did I hear the Awwww expression…) so henceforth the STEP number 2.
For this special case Oracle has TS_PITR_OBJECTS_TO_BE_DROPPED view, which can be used as:-
SELECT owner, name, tablespace_name FROM ts_pitr_objects_to_be_dropped WHERE tablespace_name =’USERS’ AND creation_time > to_date(‘<Time of TSPITR>’,’dd-mon-rrrr hh24:mi:ss’);
Above query would give you all the objects that were created after the point-in-time till where you’ll restore the tablespace (<Time of TSPITR>).
Once you get the objects you can use datapump to export the objects in concern, for example:-
expdp <username/password> tables=<Comma separated list of table name> directory=DATA_PUMP_DIR dumpfile=TSPITR_after_objects.dmp logfile=TSPITR_after_objects.log
You might have to amend the expdp statement above, directory information you’ll get via DBA_DIRECTORIES view, and if using OS authentication and want to connect as sysdba use (\”/ as sysdba\”) in UNIX.
Step 3: Create an Auxiliary Destination
Several Steps are performed internally for which RMAN needs an auxiliary destination, so we need approximately equivalent space as the size of the datafiles in the tablespace to be recovered. So once we ensure there is proper space, on that filesystem we create an Auxiliary destination.
mkdir <Path where you have sufficient space>/aux
STEP 4:- Recover the tablespace.
Now RMAN is ready to recover your tablespace you can now use until time (Until Time Clause) or until SCN (Until SCN Clause) or until sequence (Until Sequence Clause) clause to recover your tablespace.
RMAN> connect target /
RMAN> recover tablespace users until time “to_date(’12-nov-2006 16:00:00′,’dd-mon-rrrr hh24:mi:ss’)” auxiliary destination ‘<Path where you have sufficient space>/aux';
Now the most important things comes up, THE OUTPUT, from the output you can see that there is a hell lot of tasks that RMAN does for you, I have listed the tasks below in case you haven’t personally seen the beauty:-
Creates an auxiliary instance, starts it, and connects to it
Takes offline tablespaces that are involved with TSPITR
Restores the backup control file that corresponds to the target restore time
Restores datafiles to a destination specified by your AUXILIARY DESTINATION
Recovers restored datafiles in an auxiliary location
Opens an auxiliary database with the open resetlogs command
Exports the auxiliary data dictionary metadata about recovered tablespaces and shuts down the auxiliary database
Issues a switch command on the target database to update the control file to point at the recovered auxiliary datafiles
Imports objects associated with recovered tablespaces into the target database
Deletes the auxiliary datafiles
See, isn’t it a beauty..!! All this tasks are being performed while a DBA is just sitting and explaining WHAT/WHEN/HOW/WHERE to Senior Managers and Stakeholders, which I think is more difficult than the task done by RMAN in the background, if it were to me I’ll ask the RMAN to switch the tasks :)…
I always wondered if RMAN if doing all this is stuff why not export import the tables too so that we can also recover tables from RMAN, which was not possible in 11g, however studying the code helps me figure out the glitch. The great news is this has been fixed in 12c and YES you can even recover a table via RMAN in 12c.
STEP 5:- Importing the objects which were determined during STEP 2.
You guys thought its over right :)… Well it isn’t, neither with the explanation to the Senior Management nor with the TSPITR.
impdp <username/password> tables=<Comma separated list of table name> directory=DATA_PUMP_DIR dumpfile=TSPITR_after_objects.dmp logfile=TSPITR_after_objects_imp.log
So above command would be used to import the tables that were exported in STEP 5, so that even by TSPITR no objects that were created after the erroneous query are missed.
STEP 6:- Back Up the Tablespace and Alter It Online
Gotcha..!! why are you guys in so much of a hurry, its not a SQL Server or Sybase or DB2, its Oracle and you are a Oracle DBA we come with a guarantee, that we ensure every mistake done by the first fraternity (Developers) is fixed ;)
So backup your database because Oracle ensures everything except a Developer ( I am pretty sure this time I heard the F- word) and his cute little ANNOYING practices.
RMAN> backup tablespace <Tablespace Name on which we did TSPITR>;
RMAN> sql ‘alter tablespace <Tablespace Name on which we did TSPITR> online';
Now its done… No… Oh Wait… Those Senior Management on the Bridge Call, well I wish I have a STEP and a GUN for the same…
I hope this post would be helpful in scenarios when you know the recovery process but as there is lot of stress on DBAs during recovery scenarios even googling at that time for the syntax is an overhead, hence the idea is to make a repository that cover all possibile recovery scenarios step by step with syntax of commands at a single destination. I would try to cover all the scenarios in my subsequent posts. Please comment if any of the curious readers are interested to know the internals of the recovery process like which process does that, what information is in redo that is applied to the datafiles to recover them to point in time and etc.
In the following post we’ll see how to recover tablespace to a point in time (TSPITR), some of the young DBAs would be thinking why do we need to do TSPITR its an incomplete recovery and why would we ever want to do so. To those I would like to introduce them to a fraternity known as Developer (refereed as an application guy), If you are a DBA these guys job is to make sure that each and every penny that Organisation is giving you is paid off. There are n number of ways in which they do that (Did I hear the F- word…), well you’ll come across a scenario where a developer thought that they were in a test environment and issued commands to delete data from several tables in one tablespace whereas It turns out that they were in the production environment ( It might seem Stupid but I don’t know a single DBA who hasn’t faced such a situation).
So this post is to describe how to use TSPITR to restore the tablespace in question to the point-in-time just before the DELETE ( Or any other erroneous DML/DDL ) was issued.
For ease of discussion lets name the Tablespace for which we have to perform TSPITR as USERS.
STEP 1:- Determine and Resolve Dependencies between the objects in the tablespace of interest (USERS) and objects related to these via referential integrity constraint.
To get these dependencies Oracle has given a view called as TS_PITR_CHECK, which can be used as:-
SELECT * FROM sys.ts_pitr_check WHERE (ts1_name = ‘USERS‘ AND ts2_name != ‘USERS‘) OR (ts1_name != ‘USERS‘ AND ts2_name = ‘USERS‘);
So if there are any dependencies the above query would give you all the details that are required, and accordingly you can disable the constraints and make a note of it. If we don’t disable the constraints, TSPITR would not be successful.
STEP 2:- Determine Which Objects Will Not Be Recovered
We are doing a TSPITR to a point-in-time when that erroneous SQL was executed, so what about objects which were created after that time, here comes the introduction to a new fraternity which are known as Database Administrators, no matter how poorly the SQl are written, no matter what edition the database is, no matter what infra does the database run, DBAs have to ensure magical performance and almost recovery of everything… EVERYTHING… (Did I hear the Awwww expression…) so henceforth the STEP number 2.
For this special case Oracle has TS_PITR_OBJECTS_TO_BE_DROPPED view, which can be used as:-
SELECT owner, name, tablespace_name FROM ts_pitr_objects_to_be_dropped WHERE tablespace_name =’USERS’ AND creation_time > to_date(‘<Time of TSPITR>’,’dd-mon-rrrr hh24:mi:ss’);
Above query would give you all the objects that were created after the point-in-time till where you’ll restore the tablespace (<Time of TSPITR>).
Once you get the objects you can use datapump to export the objects in concern, for example:-
expdp <username/password> tables=<Comma separated list of table name> directory=DATA_PUMP_DIR dumpfile=TSPITR_after_objects.dmp logfile=TSPITR_after_objects.log
You might have to amend the expdp statement above, directory information you’ll get via DBA_DIRECTORIES view, and if using OS authentication and want to connect as sysdba use (\”/ as sysdba\”) in UNIX.
Step 3: Create an Auxiliary Destination
Several Steps are performed internally for which RMAN needs an auxiliary destination, so we need approximately equivalent space as the size of the datafiles in the tablespace to be recovered. So once we ensure there is proper space, on that filesystem we create an Auxiliary destination.
mkdir <Path where you have sufficient space>/aux
STEP 4:- Recover the tablespace.
Now RMAN is ready to recover your tablespace you can now use until time (Until Time Clause) or until SCN (Until SCN Clause) or until sequence (Until Sequence Clause) clause to recover your tablespace.
RMAN> connect target /
RMAN> recover tablespace users until time “to_date(’12-nov-2006 16:00:00′,’dd-mon-rrrr hh24:mi:ss’)” auxiliary destination ‘<Path where you have sufficient space>/aux';
Now the most important things comes up, THE OUTPUT, from the output you can see that there is a hell lot of tasks that RMAN does for you, I have listed the tasks below in case you haven’t personally seen the beauty:-
Creates an auxiliary instance, starts it, and connects to it
Takes offline tablespaces that are involved with TSPITR
Restores the backup control file that corresponds to the target restore time
Restores datafiles to a destination specified by your AUXILIARY DESTINATION
Recovers restored datafiles in an auxiliary location
Opens an auxiliary database with the open resetlogs command
Exports the auxiliary data dictionary metadata about recovered tablespaces and shuts down the auxiliary database
Issues a switch command on the target database to update the control file to point at the recovered auxiliary datafiles
Imports objects associated with recovered tablespaces into the target database
Deletes the auxiliary datafiles
See, isn’t it a beauty..!! All this tasks are being performed while a DBA is just sitting and explaining WHAT/WHEN/HOW/WHERE to Senior Managers and Stakeholders, which I think is more difficult than the task done by RMAN in the background, if it were to me I’ll ask the RMAN to switch the tasks :)…
I always wondered if RMAN if doing all this is stuff why not export import the tables too so that we can also recover tables from RMAN, which was not possible in 11g, however studying the code helps me figure out the glitch. The great news is this has been fixed in 12c and YES you can even recover a table via RMAN in 12c.
STEP 5:- Importing the objects which were determined during STEP 2.
You guys thought its over right :)… Well it isn’t, neither with the explanation to the Senior Management nor with the TSPITR.
impdp <username/password> tables=<Comma separated list of table name> directory=DATA_PUMP_DIR dumpfile=TSPITR_after_objects.dmp logfile=TSPITR_after_objects_imp.log
So above command would be used to import the tables that were exported in STEP 5, so that even by TSPITR no objects that were created after the erroneous query are missed.
STEP 6:- Back Up the Tablespace and Alter It Online
Gotcha..!! why are you guys in so much of a hurry, its not a SQL Server or Sybase or DB2, its Oracle and you are a Oracle DBA we come with a guarantee, that we ensure every mistake done by the first fraternity (Developers) is fixed ;)
So backup your database because Oracle ensures everything except a Developer ( I am pretty sure this time I heard the F- word) and his cute little ANNOYING practices.
RMAN> backup tablespace <Tablespace Name on which we did TSPITR>;
RMAN> sql ‘alter tablespace <Tablespace Name on which we did TSPITR> online';
Now its done… No… Oh Wait… Those Senior Management on the Bridge Call, well I wish I have a STEP and a GUN for the same…
I hope this post would be helpful in scenarios when you know the recovery process but as there is lot of stress on DBAs during recovery scenarios even googling at that time for the syntax is an overhead, hence the idea is to make a repository that cover all possibile recovery scenarios step by step with syntax of commands at a single destination. I would try to cover all the scenarios in my subsequent posts. Please comment if any of the curious readers are interested to know the internals of the recovery process like which process does that, what information is in redo that is applied to the datafiles to recover them to point in time and etc.
Useful Links for Oracle DBA
Oracle 12c Architecture:
https://nitishanandsrivastava.wordpress.com/oracle-12c-miscellaneous/12c-new-features-online-datafile-move/
Row chaining and Row migration:
http://www.akadia.com/services/ora_chained_rows.html
Interview QA
Interview QA:
-------------
1. How to perform the user managed backup manually?
If we want to take a user managed backups. First we should be put database is in begin backup mode and the cp all the required file to backup location and change the database mode to end backup.
> ALTER DATABASE BEGIN BACKUP;
$CP *dbf /u02/backup/
> ALTER DATABASE END BACKUP;
2. Why more logs are generated after change the database mode to begin backup?
The two things will happen when the tablespace in backup mode
1.) The datafile header associated with the tablespace in the backup up mode will be in frozen state.So it stops updating the datafile header, but it continually writes into the datafile.
2.) More redos are generated.This is because oracle will write all the changed blocks into the redo log.Normally only the changes are logged into the redo logs.
Datafiles are not freezed, only the datafile headers will be freezed !! So simply imagine that when you put the tablespace in backup mode, Oracle will take a checkpoint and update the datafile headers with checkpoint SCN and there after it is freezed until we take tablespace out of backup mode.
3. CACHE FUSION?
-------------
1. How to perform the user managed backup manually?
If we want to take a user managed backups. First we should be put database is in begin backup mode and the cp all the required file to backup location and change the database mode to end backup.
> ALTER DATABASE BEGIN BACKUP;
$CP *dbf /u02/backup/
> ALTER DATABASE END BACKUP;
2. Why more logs are generated after change the database mode to begin backup?
The two things will happen when the tablespace in backup mode
1.) The datafile header associated with the tablespace in the backup up mode will be in frozen state.So it stops updating the datafile header, but it continually writes into the datafile.
2.) More redos are generated.This is because oracle will write all the changed blocks into the redo log.Normally only the changes are logged into the redo logs.
Datafiles are not freezed, only the datafile headers will be freezed !! So simply imagine that when you put the tablespace in backup mode, Oracle will take a checkpoint and update the datafile headers with checkpoint SCN and there after it is freezed until we take tablespace out of backup mode.
3. CACHE FUSION?
Subscribe to:
Posts (Atom)